
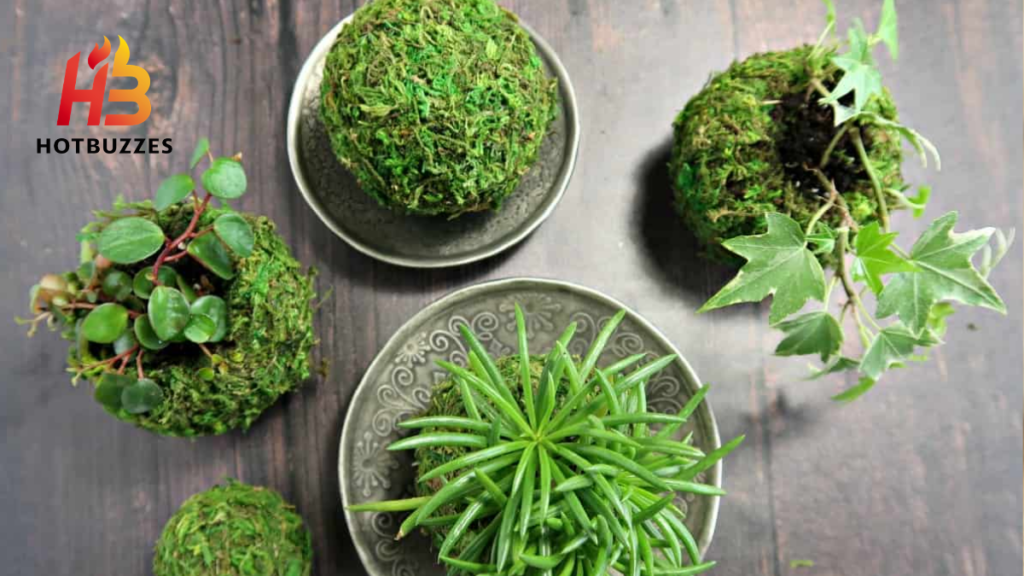
Kokedama is a Japanese gardening technique that swaps the traditional pot for a tightly bound ball of soil and moss. It lets a plant’s roots live inside a self-contained sphere rather than a container. The word itself simply means moss ball. It combines “koke” for moss and “dama” for ball. The result is often described as a living sculpture rather than an ordinary houseplant.
This guide walks through the entire process of building a kokedama from scratch. It covers the right soil mix, plant selection, wrapping technique, and the specific watering routine that keeps a moss ball alive without a pot underneath it. It also includes a side-by-side comparison table. There is a section on research-backed facts about the technique’s origins and lifespan. It also provides troubleshooting guidance for the handful of problems that tend to come up most often.
What Is Kokedama?
Kokedama is a centuries-old Japanese technique that encases a plant’s root ball in a nutrient-rich soil mixture, then wraps that soil ball in living or preserved moss held in place with twine, according to Alibaba’s Life Tips guide.
Origins in the Edo Period
The practice dates back to Japan’s Edo period, roughly 1600 to 1868. This was a period known for significant agricultural development, according to BWH Plant Co’s kokedama guide. Kokedama emerged as a kind of offshoot of bonsai culture. It is closely related to nearai, the practice of displaying a bonsai’s root ball without a pot. It is also related to ikebana, the Japanese art of flower arrangement, according to Bonsai Empire’s step-by-step guide. Because it strips away the cost and formality associated with more traditional bonsai display, kokedama has sometimes been nicknamed the poor man’s bonsai. This term is repeated by both Pistils Nursery and Plantify’s mossball care page.
Why It Looks the Way It Does
Without a pot to frame or distract from the plant, a kokedama’s charm comes entirely from its natural, sculptural simplicity, according to 7 Dees’ DIY kokedama guide. The format can be suspended by a string. It can also be rested on a small ceramic dish or clustered at varying heights. Bloomist’s kokedama guide notes that this versatility makes kokedama a practical option for spaces where a traditional planter might not fit or feel right.
What You Will Need
Building a kokedama does not require any specialized tools, though a few specific materials make the process considerably easier.
Soil Mix Ingredients
The traditional soil recipe combines akadama, a Japanese clay-like substrate, with peat moss and coarse sand, generally in a 2 to 1 to 1 ratio, according to be.green’s kokedama guide. Because true akadama can be expensive and difficult to source outside Japan, many growers substitute a general bonsai soil mix or a standard container potting mix containing perlite, which provides similar air pockets for drainage without needing to be imported, according to Home for the Harvest’s kokedama guide.
Moss and Binding Materials
Sheet moss, sphagnum moss, or moss harvested from a shady spot in a garden or park can all be used to wrap the finished soil ball, according to Bonsai Empire. Natural twine, fishing line, or thin wire is used to bind the moss tightly against the soil. Twine is the most common choice. It blends visually into the finished piece. Unlike wire, it will not cut into the moss or restrict airflow as the kokedama settles.
Choosing the Right Plant
Plants with compact, fibrous root systems tend to work best for kokedama. They hold together well once separated from potting soil, according to Alibaba’s Life Tips guide, which lists pothos, ferns, and nerve plants as reliable options. Additional beginner-friendly choices mentioned by 7 Dees include dwarf daisies, epiphytic ferns such as staghorn or rabbit’s foot fern, hoyas, and small succulents like haworthia.
Preparing the Soil Mix
Getting the soil mixture right is one of the more important steps in the entire process, since a mix that is too loose will not hold its shape, and a mix that is too dense will suffocate the plant’s roots.
Mixing and Moistening
Combining equal parts bonsai soil mix and coconut coir or peat moss produces a workable base, according to Epic Gardening’s kokedama guide. Gradually add water until the mixture holds together without becoming soggy. The mixture should cling together enough to maintain its shape when pressed. It should never feel dense or compacted. A dense mix becomes heavy and cuts off the airflow roots need to stay healthy long term.

Adjusting the Consistency
If the soil mix keeps falling apart while being handled, adding more crushed akadama or bonsai soil firms it up, according to Epic Gardening. A mix that has become too wet can be corrected by working in more dry soil mix. You can also let it air-dry for a few minutes before continuing. Getting this balance right before moving on to the next step saves a considerable amount of frustration later. A poorly balanced mix tends to crack or crumble once it is shaped into a ball and dries even slightly.
Preparing the Plant
Before the soil ball can be assembled, the plant itself needs to be removed from its original growing medium and prepared for its new, potless home.
Removing the Plant From Its Pot
Gently slide the plant free of its nursery pot. Then carefully shake or rinse away the existing potting soil from around the roots. This exposes the root system that will be wrapped in the new kokedama mix, according to Bonsai Empire’s step-by-step guide. Take care not to tear or crush the roots during this step. This matters more than it might seem. Damaged roots are considerably more prone to rot once wrapped inside a moist, enclosed soil ball.
Shaping the Root Ball
Once the old soil has been cleared away, gently shape the loose roots into a rough, round mass. Trim the root ball down slightly if it is unusually large. This helps the final kokedama end up a manageable, proportionate size rather than an oversized, unwieldy sphere, according to Bonsai Empire. Removing any dead, damaged, or overly long roots at this stage also gives the plant a cleaner foundation to regrow from once it is settled into its new moss ball.
Forming the Soil Ball
With both the soil mix and the plant ready, the next step is to combine them into the signature spherical shape.
Splitting and Filling
A common technique involves shaping the prepared soil mix into a ball roughly the size of a navel orange for a typical four-inch plant. Then, split that ball in half. Place the plant’s roots inside. Press the two halves back together around the base of the stem, according to 7 Dees’ DIY guide. An alternative method, described by McCabe’s Landscape Construction, involves gradually adding water to the akadama mixture until it can be formed into a ball. Then, make a hole in that ball and insert the roots directly. Push the surrounding clay mix firmly against them afterward.
Molding a Seamless Sphere
Whichever method is used, mold the soil firmly around the roots into a smooth, seamless sphere. Keep it free of major cracks or gaps. This gives the finished kokedama both a cleaner appearance and a sturdier structure once it is wrapped in moss. Continue to lightly spray the ball with water while shaping it, as recommended by McCabe’s Landscape Construction. This keeps the mixture pliable enough to work with throughout this stage. It also prevents it from drying out and crumbling before the moss layer goes on.
Wrapping the Moss
Once the soil ball has taken shape, wrapping it in moss transforms it from a plain clump of soil into the recognizable kokedama form.
Applying the Moss Layer
If dried moss is being used rather than fresh, soak it in water for about an hour beforehand. This makes it pliable enough to wrap smoothly around the curved surface of the soil ball, according to McCabe’s Landscape Construction. Then press the pre-moistened moss firmly around the entire soil ball. Overlap the edges as needed. Continue until the soil underneath is completely covered and no bare patches remain visible.
Securing With Twine
Cut a length of twine roughly three to four yards long. Leave a short tail to tie off at the end. Wrap it tightly around the moss-covered ball in a crisscrossing pattern. Change direction every so often. Make sure to wrap underneath the ball as well. This holds everything firmly in place, according to 7 Dees. Tie the working end back to the original starting tail once the wrapping is complete. This finishes the binding. Gently reshape the moss ball by hand afterward. This smooths out any lumps or uneven spots left over from the wrapping process.
Kokedama Assembly at a Glance
The table below summarizes the core steps and materials covered so far for quick reference.
| Stage | Key Materials | What to Watch For |
|---|---|---|
| Soil mix | Akadama or bonsai soil, peat moss or coconut coir, coarse sand | Should hold shape but never feel soggy or overly dense |
| Plant prep | Existing potted plant, water for rinsing roots | Avoid tearing or crushing the root system |
| Forming the ball | Prepared soil mix, water for moistening | Mold into a smooth, seamless sphere around the roots |
| Moss wrap | Sheet or sphagnum moss, water for soaking dried moss | Cover the soil ball completely, no bare patches |
| Securing | Natural twine, fishing line, or thin wire | Wrap tightly, crisscrossing, including underneath the ball |
| Finishing | Hands for reshaping | Smooth out lumps for an even, rounded shape |
Watering a Finished Kokedama
Because a kokedama has no pot and no drainage hole, its watering routine looks quite different from that of a conventional houseplant.
The Submersion Method
The primary way to water a kokedama is by fully submerging the ball, plant side up, in a bowl or basin of room-temperature water, according to Biology Insights’ kokedama care guide. Small air bubbles rising to the surface show that the soil core is absorbing water. Soak it for 10 to 25 minutes. Continue until the bubbles stop appearing. This signals that the ball is fully saturated.
Draining and Aftercare
Once fully soaked, remove the kokedama from the water. Gently squeeze it to release any excess moisture. Then leave it to drip-dry in a colander or sink for several minutes before returning it to its display spot, according to Pistils Nursery’s watering procedure. Skipping this drain time can leave water pooling underneath it. This is worth avoiding for the sake of nearby furniture and the health of the moss ball itself.
How Often to Water
Watering frequency varies fairly widely depending on the specific plant, the surrounding humidity, and how the kokedama is displayed. According to Tranquil Plants’ care guide, a general rule of thumb is to water every six to nine days. Hotter homes may require more frequent watering than milder ones. 7 Dees suggests most indoor kokedama need watering every seven to ten days. Kazumi Garden notes that many kokedama only need to be submerged twice a month. This illustrates just how much this figure can shift based on the individual plant and environment involved.
Judging When to Water by Weight and Feel
Because watering needs vary so much between individual kokedama, most guides recommend judging by physical cues rather than sticking to a fixed calendar schedule. Learn the key differences between closed terrariums and open containers to choose the right setup for your plants.
The Weight Test
A dry kokedama feels noticeably lighter when lifted. A well-watered one feels heavier and more solid, according to Biology Insights’ care guide. Get a feel for how a specific kokedama feels right after a thorough soaking. Compare it to how it feels once it has mostly dried out. This makes the weight-based check considerably easier to rely on with confidence over time.
Surface and Leaf Cues
A moss surface that feels dry or slightly crispy to the touch is another reliable signal that a soak is overdue, according to Biology Insights. On the plant itself, sagging leaves are one of the clearest visual cues that watering is needed, according to Tranquil Plants. A kokedama’s weight and the condition of its leaves together tend to communicate its needs fairly clearly. This becomes easier once an owner learns to recognize the pattern.
Light and Placement
Where a kokedama is displayed affects both the plant’s health and how quickly the moss ball dries out between waterings. Explore the top plants for closed terrariums and learn what makes each one suitable for enclosed growing.
General Light Requirements
Most common kokedama plants, including ferns, ivy, pothos, and philodendrons, do well with roughly four to six hours of bright, indirect light per day, according to BWH Plant Co. There is no pot or soil depth buffering the plant from its immediate surroundings. Direct, intense sun can dry out and stress a kokedama considerably faster than it would a comparable plant sitting in a standard container.
Display Style and Drying Rate
Hanging kokedama tend to dry out faster than those resting in a shallow tray or bowl, according to 7 Dees. A suspended ball has more exposed surface area in contact with open air on every side. For anyone traveling or away from home for a stretch, grouping hanging kokedama together in a shallow tray with about an inch of standing water helps them stay hydrated. Place the tray in dappled or full shade. This avoids needing a full submersion soak during that absence.
Fertilizing and Long Term Feeding
A kokedama’s compact soil volume holds fewer nutrients than a standard pot, which makes occasional feeding an important part of long-term care.
Feeding Schedule
Applying a diluted, half strength liquid fertilizer once a month during the active spring and summer growing season is a widely recommended approach, according to both Plantify and 7 Dees. Mix the fertilizer directly into the water used for the regular soaking session. This distributes nutrients evenly through the soil core without requiring any extra steps beyond the kokedama’s normal watering routine.
Why Overfeeding Is a Bigger Risk Than in a Pot
Because a kokedama’s soil ball is smaller and has no drainage hole to flush excess nutrients away, overfeeding can allow fertilizer salts to build up more quickly than they would in a standard container. This is part of why the recommended concentration stays diluted to half strength rather than full strength. Sticking to a modest, once-a-month feeding schedule during the growing season keeps this risk low. Skip fertilizer entirely during the slower fall and winter months. This avoids depriving the plant of nutrients when it actually needs them most.

Twine Maintenance and Reshaping
The twine holding a kokedama together does not last indefinitely, and a bit of periodic upkeep keeps the structure intact over time.
When to Rewrap
Inspect and rewrap natural twine every four to six months. You can also do this whenever it visibly loosens or begins to fray. This is recommended by 7 Dees to keep the moss securely bound to the soil ball underneath. Natural fiber twine breaks down gradually with repeated soaking. This periodic check prevents a slowly loosening kokedama from suddenly falling apart in someone’s hands during a routine watering session.
Reshaping an Aging Kokedama
If the moss ball loses its round shape over time, refreshing the piece with new twine can restore its structural integrity and original appearance, according to Biology Insights. If needed, add a fresh layer of moss as well. This kind of light refresh is considerably less involved than a full re-balling, discussed later in this guide. It can often be done without disturbing the plant’s roots at all.
How Long a Kokedama Lasts
Unlike a conventional potted plant, a kokedama has a natural lifespan built into its very structure, tied to how much room its compact soil ball actually provides for ongoing root growth.
Typical Lifespan
Most sources agree that a well-cared-for kokedama lasts somewhere between one and three years before the plant outgrows its moss ball or the structure needs significant refreshing, according to both Bloomist and Kazumi Garden. Faster-growing plants tend to reach this point sooner than slower-growing ones. A vigorously growing root system fills the limited soil volume more quickly than a compact, slow-growing species would.
Signs a Kokedama Needs Re-Balling
Roots visibly emerging through the moss surface are one of the clearest signals that a kokedama has outgrown its current ball and needs attention, according to Plantify. Check for this sign after roughly 18 to 24 months. At that point, a kokedama can either be rebuilt into a larger moss ball to give the roots more room. It can also be transplanted into a standard pot if a return to conventional container gardening is preferred.
Re-Balling a Kokedama Step by Step
When a kokedama has genuinely outgrown its structure, rebuilding it from scratch, rather than simply patching the existing moss and twine, gives the plant a proper fresh start.
Removing the Old Structure
Gently unwrap the twine and peel away the old moss layers. This exposes the root ball underneath, according to Alibaba’s Life Tips guide. Rinse the roots at this stage and trim away any damaged or overly long sections before proceeding. The original soil should be discarded entirely rather than reused. It has typically become depleted of nutrients and compacted after months of repeated soaking.
Rebuilding With Fresh Materials
Mixing a fresh batch of soil using the same general ratio as the original build repeats the original assembly process on a rejuvenated root system. Then re-wrap the roots with new sphagnum or sheet moss. The plant already has an established root structure at this stage. It is larger than the smaller starter root ball used the first time around. The finished re-balled kokedama is often built somewhat larger than the original to accommodate that additional growth.
Common Problems and How to Fix Them
A handful of recurring issues tend to affect kokedama more than they do standard potted plants, largely because of the lack of a pot, soil depth, and drainage hole. Find humidity-loving plants that can thrive inside a closed terrarium with minimal daily care.
Mold on the Moss Surface
White, fuzzy mold or fungus appearing on the moss surface is typically a sign of poor airflow or prolonged saturation, according to Biology Insights. Wipe the affected area with a diluted dish soap solution, roughly one part soap to ten parts water. Then relocate the kokedama to a spot with better ventilation. A kokedama has no drainage hole to help excess water escape the way a standard pot does. Preventing overly frequent watering in the first place goes a long way toward preventing this problem before it starts.
Signs of Underwatering
Crisping, browning leaf edges point toward underwatering, according to Plantify’s care guide. The fix is simply shortening the interval between soaking sessions. There is no need to change anything else about the watering method itself. Since a kokedama dries out from the outside in, catching this symptom early generally leads to a faster recovery. This is better than waiting until the entire ball feels bone dry and light.
Signs of Overwatering
Yellowing leaves, blackened stems near the base, or a soft, mushy texture in the leaves or stem all indicate overwatering, according to Plantify. The correction involves lengthening the time between waterings. Do not add any additional water in the short term. Trapped moisture beneath a dense layer of moss can encourage anaerobic bacteria capable of rotting roots within days, according to Alibaba’s Life Tips guide. Catching and correcting overwatering symptoms promptly matters even more with kokedama than it does with a conventional potted plant.
Research-Based Facts About Kokedama
Beyond the practical building and care steps, a few documented facts help explain both the history and the underlying logic behind this technique.
The Edo Period Origins
Kokedama traces its roots to Japan’s Edo period, spanning roughly 1603 to 1868, according to BWH Plant Co. This was an era particularly known for advances in agricultural development. This timeline places kokedama’s origins well over 350 years in the past. This makes it considerably older than many of the houseplant trends it is sometimes grouped alongside in modern gardening media.
Why Akadama Works So Well as a Growing Medium
Genuine akadama clay contains a significant number of tiny air voids within its particle structure, according to Home for the Harvest’s kokedama guide. These allow it to hold onto both moisture and nutrients while still providing pathways for air and drainage. This dual capacity, retaining water while still allowing airflow, is precisely what a kokedama’s roots need in an environment that has no drainage hole to rely on. This explains why substitute soil mixes generally aim to replicate this same air pocket structure using materials like perlite. They do this rather than simply approximating akadama’s appearance or color.
Lifespan Data Across Multiple Sources
Independent sources describing kokedama lifespan consistently converge on a range of one to three years before significant intervention is needed. Kazumi Garden specifically cites up to three years. Biology Insights cites a similar one-to-three-year window before repotting or rewrapping becomes necessary. This consistency across multiple independent sources suggests the figure reflects a genuine structural limit tied to the technique’s inherently small soil volume. It is not an arbitrary recommendation repeated without verification.
Kokedama vs Standard Potted Plants
Understanding how kokedama differs from conventional container gardening highlights exactly why its care routine looks so different.
Watering Method
You typically water a standard potted plant by pouring water onto the soil surface. Excess water then drains through a hole at the bottom of the pot. A kokedama has no pot or drainage hole. Instead, you water it by fully submerging the moss ball. This method saturates the soil ball evenly from every angle. It does not rely on water trickling downward through a single column of soil as it does in a conventional pot.
Root Environment
Roots in a standard pot generally have more total soil volume to spread through as the plant matures, along with the option of moving to a progressively larger pot over time. A kokedama confines the plant’s roots to a fixed, relatively small volume of soil from the beginning. This limited space gives the technique a natural lifespan. Unlike a plant in a conventional pot, you cannot keep providing more room by moving it into increasingly larger pots.
Visual Presentation
A potted plant’s container is a functional vessel first and a decorative element second, while a kokedama’s moss-covered exterior is inseparable from its visual identity, doubling as both the plant’s growing medium and its primary aesthetic feature.This limitation helps explain why people often describe kokedama as living sculptures rather than potted plants without pots. Removing the moss layer would fundamentally change the piece itself, not just its appearance.
Displaying a Finished Kokedama
Once a kokedama is complete, how it is displayed plays a meaningful role in both its appearance and its ongoing care needs.
Hanging Displays
Suspending a kokedama by its twine, either individually or in a cluster of varying heights, creates a floating, sculptural effect that has become one of the technique’s most recognizable presentations. As covered earlier, hanging kokedama dry out faster than those resting on a surface, so this display style generally calls for slightly closer attention to the weight and surface dryness cues discussed above.
Tray and Dish Displays
Resting a kokedama on a small ceramic dish or in a shallow tray offers a more stable, lower-maintenance alternative to hanging, since the ball retains moisture a bit longer when it is not fully exposed to open air on every side. This style also makes it easier to group several kokedama together at a consistent height, which some growers prefer for creating a small, cohesive tabletop or shelf display.
Grouping Multiple Kokedama
Clustering kokedama of different plant species and moss textures together creates visual variety without requiring separate pots or planters for each individual piece, echoing the same kind of layered, landscape-like arrangement often associated with terrarium displays. You can manage different watering needs more easily in a kokedama cluster because you water each moss ball individually through submersion. Unlike a shared pot or terrarium, each plant has its own separate soil system. This allows you to adjust the watering frequency for each plant without affecting the others.

Choosing Moss for the Wrap
Different moss types behave differently when you bind them tightly around a soil ball and soak them repeatedly. The moss you choose affects both the kokedama’s appearance and its maintenance.
Sheet Moss and Sphagnum Moss
Sheet moss, which grows in flat, connected mats, is a popular choice for kokedama because it wraps smoothly around a curved surface and tends to hold its green color well with regular watering. Sphagnum moss holds an exceptional amount of water. However, its loose, fibrous texture can make it slightly harder to shape into a perfectly smooth sphere than sheet moss.
Harvested vs. Store-Bought Moss
According to Bonsai Empire, you can use moss collected from a shaded, damp spot in a garden or park. Rinse the moss and inspect it for pests or debris before pressing it onto the kokedama. Store-bought sheet moss offers a more predictable, uniform texture and is generally free of the soil pests that occasionally hitch a ride on wild-harvested moss, which makes it a safer choice for anyone building a kokedama to keep indoors near other houseplants.
Best Plants for Beginners
Some plants tolerate the kokedama technique and the inevitable mistakes that come with a first attempt far better than others.
Forgiving, Low-Maintenance Choices
Pothos is frequently recommended as an ideal starter plant for kokedama, since its trailing growth habit suits a hanging display and its tolerance for inconsistent watering forgives a beginner still learning to judge the weight and dryness cues covered earlier. Ferns and philodendrons are similarly forgiving, adapting well to the humidity fluctuations that come with a soil ball lacking a pot’s insulating depth.
Plants That Require More Experience
Flowering plants and certain succulent varieties tend to be less forgiving in kokedama form, since flowering species often have higher and more specific water needs, while succulents are prone to rot if the moss stays damp for too long after a soak. Attempting a kokedama with one of these more demanding plant types is entirely possible, but it generally goes more smoothly once the basic technique has already been practiced on a hardier species first.
Kokedama for Outdoor Use
While kokedama are commonly kept indoors, the technique also has a long history of outdoor and garden display, particularly for larger plants and small trees.
Outdoor Placement Considerations
Outdoor kokedama, especially during summer, often require watering daily, according to 7 Dees, since direct sun and open air exposure dry out the moss considerably faster than typical indoor conditions. Placing outdoor kokedama in a spot with dappled shade rather than full, unfiltered sun helps moderate this faster drying rate without sacrificing the light most outdoor-friendly plants still need to thrive.
Weather Protection
Heavy, sustained rain can oversaturate an outdoor kokedama in a way that mimics overwatering, so moving pieces under partial cover during extended wet weather, or during a hard freeze in colder climates, helps protect both the moss and the plant’s roots from conditions the compact soil ball was never designed to handle on its own. Bringing outdoor kokedama indoors, or at least under a covered porch, during particularly harsh weather extends their usable lifespan considerably compared to leaving them fully exposed year-round.
Gifting and Special Occasion Kokedama
Because a finished kokedama is compact, self-contained, and visually distinctive, it has become a popular choice for gifts and special event décor.
Kokedama as Gifts
A small kokedama requires no additional planter or accessories to be a complete, ready-to-display gift, which makes it considerably simpler to hand off than a traditional potted plant that might arrive without a matching pot. Including a brief care card noting the specific plant type and its general watering interval helps a recipient who may be unfamiliar with the submersion watering method get off to a confident start.
Event and Wedding Displays
Clusters of small kokedama, sometimes suspended from a simple wooden frame or displayed along a table runner, have become a favored decorative element at weddings and other events specifically because they combine living greenery with a compact, low-mess footprint that traditional potted centerpieces cannot easily match. Because each piece is watered individually and does not require ongoing soil top-ups the way a potted centerpiece might, kokedama displays also tend to hold up well throughout the course of a single event without needing mid-event maintenance.
Cost and Budget Considerations
Building a kokedama from scratch is generally an inexpensive project, particularly compared to purchasing a similarly sized finished piece from a specialty retailer.
Cost of Materials
A basic bonsai soil mix, a bag of sheet moss, and a spool of natural twine cover the core materials for several kokedama, and all three items are widely available at general garden centers without needing to be sourced from a specialty bonsai supplier. The plant itself is typically the highest single cost, and choosing an already inexpensive, readily available species like pothos or a small fern keeps the total project cost modest even for a first attempt.
Reusing Materials Across Projects
Because a single bag of soil mix or moss can typically stretch across several kokedama, building multiple pieces at once, whether as gifts or for a personal display cluster, tends to be more cost-efficient per piece than making just one at a time. Leftover twine and any unused soil mix can be stored easily for future projects, which further reduces the cost of building additional kokedama down the line once the initial supplies have been purchased.
Tools Worth Having Beyond the Basics
While kokedama does not require specialized equipment, a few extra tools make the process noticeably smoother, especially for anyone planning to build more than one piece.
A Dedicated Mixing Bowl and Spray Bottle
Keeping a bowl set aside specifically for mixing soil, along with a fine mist spray bottle for adjusting moisture as the mix is worked, removes the need to improvise with kitchen items each time a new kokedama is started. A spray bottle is particularly useful during the shaping stage, where small, controlled adjustments to moisture matter more than a heavy pour from a watering can would allow.
Pruning Shears and a Root Hook
A small pair of clean pruning shears makes trimming damaged or overly long roots during plant preparation considerably easier and cleaner than tearing them by hand, which reduces the risk of additional root damage. A root hook, a simple curved tool used in bonsai care to gently loosen compacted soil from around roots, can also help when removing a plant from a particularly tightly packed nursery pot without harming the root system underneath.
Choosing a Container-Free Lifestyle
Kokedama fits into a wider trend of pot-free and minimalist plant display styles that have grown in popularity alongside more traditional container gardening.
Why Some Growers Prefer Potless Displays
Removing the pot entirely shifts the visual focus fully onto the plant and its root structure, creating a more organic, unstructured look that some growers find more visually interesting than a uniform row of matching planters. This aesthetic appeal, combined with the practical benefit of not needing to coordinate pot styles and sizes across an entire plant collection, is part of why kokedama has found a steady following well beyond its original bonsai-adjacent roots.
Practical Tradeoffs of Going Potless
The trade-off for this distinctive look is a care routine that depends more heavily on physical cues, weight, surface dryness, and leaf condition, rather than the more familiar visual cue of checking soil moisture through a pot’s drainage hole or surface. For growers willing to learn this different set of signals, the payoff is a genuinely unique way to display a plant that a conventional pot simply cannot replicate.
Kokedama and Indoor Air Humidity
Because a kokedama’s exposed moss surface interacts directly with the surrounding air, the humidity of its environment plays a larger role in its care than it typically does for a potted plant.
Humidity’s Effect on Drying Rate
A kokedama kept in a naturally humid room, such as a bathroom with good light or a kitchen with regular cooking steam, tends to dry out more slowly between waterings than the same piece kept in a dry, centrally heated living room. This means the six-to-ten-day watering interval commonly cited across the sources in this guide should be treated as a general starting point, with actual frequency needing to be adjusted up or down based on a specific home’s humidity levels.
Supplementing Humidity When Needed
For kokedama kept in particularly dry indoor conditions, especially during winter months when heating systems tend to lower ambient humidity considerably, occasional misting between full soaking sessions helps keep the moss surface from drying out and browning prematurely. This misting is a supplement to, not a replacement for, the regular submersion soaking that actually rehydrates the soil core, since surface misting alone does not reach deep enough into the ball to address the root zone’s actual water needs.
Combining Kokedama With Other Display Elements
A finished kokedama does not need to stand entirely alone, and pairing it with a few complementary elements can enhance its overall presentation.
Decorative Dishes and Stands
A small, shallow ceramic dish placed beneath a resting kokedama not only catches any drips after a soak but also gives the piece a defined visual base, similar to how a saucer completes a potted plant’s presentation. Wooden stands or small tripod frames designed specifically for displaying kokedama are also widely available and can elevate a piece to a more prominent height on a shelf or table without needing to be suspended from the ceiling.
Mixing Kokedama With Traditional Pots
Some growers place a kokedama directly into a wide, shallow bowl or pot without soil, using the container purely as a decorative frame rather than a growing medium. This approach lets a kokedama sit comfortably alongside more traditional potted plants in the same room or shelf display, borrowing some of the structure and color coordination of container gardening while still preserving the moss ball’s distinctive, potless growing method underneath.
FAQS
Q1. How long does it take to make a kokedama?
The hands-on assembly process, from mixing the soil to securing the final twine wrap, typically takes somewhere between thirty minutes and an hour, depending on the size of the plant and how much time is spent shaping and smoothing the final ball. Preparation steps like soaking dried moss beforehand add extra time on top of the active assembly itself.
Q2. How often should a kokedama be watered?
This varies by plant and environment, but most sources suggest submerging a kokedama roughly every six to ten days, checking by weight and surface dryness rather than sticking to a fixed calendar schedule. Succulent kokedama can go two to three weeks between waterings, while moisture-loving plants may need soaking closer to once a week.
Q3. Can any houseplant be turned into a kokedama?
Not ideally. Plants with compact, fibrous root systems, such as pothos, ferns, and nerve plants, generally work best, since their roots hold together well once separated from their original soil. Plants with long taproots or very large, sprawling root systems are typically poor candidates for this technique.
Q4. Why does my kokedama moss have white, fuzzy patches?
This is usually mold caused by poor airflow or excessively frequent watering. Wiping the affected area with a diluted dish soap solution and moving the kokedama to a spot with better ventilation typically resolve the issue.
Q5. How long does a kokedama last before it needs to be redone?
Most kokedama last between one and three years before the plant’s roots outgrow the available soil volume, at which point roots visibly emerging through the moss signal that it is time to re-ball the plant into a fresh, larger moss sphere or move it into a conventional pot.
Q6. Is kokedama the same thing as a terrarium?
No. A kokedama is an exposed, potless ball of soil and moss with no glass enclosure at all, watered by full submersion, while a terrarium is a plant grown inside a clear glass or plastic container that traps humidity. The two techniques share a general fascination with moss and low-maintenance greenery, but they function quite differently in terms of humidity, watering, and overall structure.
Conclusion
Making a kokedama comes down to four core stages. First, prepare a soil mix that holds together without suffocating the roots. Next, shape that mix around a carefully prepared plant. Then, wrap the finished ball tightly in moss. Finally, learn to read a kokedama’s weight and surface condition. This helps you know when it needs its next soak.
None of these steps require rare materials or advanced techniques. The reward is a genuinely distinctive, centuries-old way to display a plant. It looks just as striking hanging from a ceiling as it does resting quietly on a small dish. With a bit of routine care and, eventually, a fresh re-balling once the roots outgrow their sphere, a single kokedama can remain a living centerpiece for years at a time.

Ajwa Asif is a writer with a passion for plants, gardening, and creating educational content. She researches plant-related topics using reputable horticultural resources and shares practical advice to help readers grow healthier plants and build confidence in their gardening journey. Her content focuses on delivering clear, reliable, and user-focused information.