
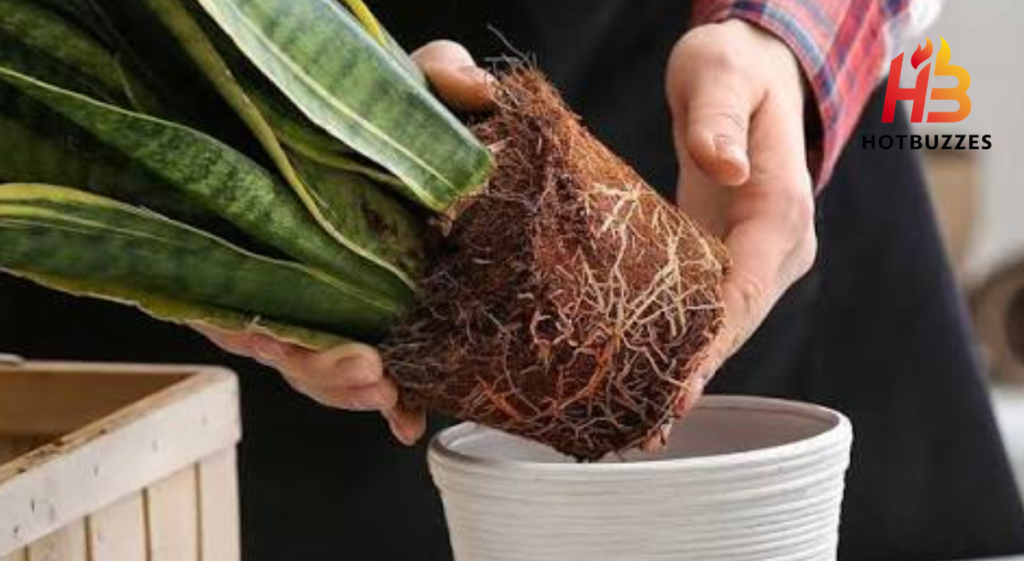
There is a specific moment in early spring when houseplants that have been quietly sitting through winter begin to show signs of waking up. A new leaf emerges. The soil dries faster than it did in January. A root appears at the bottom of a drainage hole that was not there last month. This is the window that experienced plant growers know to watch for, because it marks the beginning of the best repotting season of the year.
Spring repotting is not just a tradition. It is a decision backed by plant biology. According to Veryplants’ May 2026 indoor plant spring guide, March through June is the repotting window, with mid-April to mid-May being the sweet spot for most plants in most climates. The plant is in active growth, light is increasing, and there is a full season ahead for the roots to re-establish. That combination of conditions, rising light, increasing metabolism, and months of growing season remaining, makes spring the most forgiving and productive time to disturb a root system and ask it to adapt to a new environment.
This guide covers every dimension of the spring repotting process, how to know when a plant actually needs repotting, which ones do not, what soil matches what plant, the step-by-step mechanics of repotting without causing unnecessary shock, and the specific aftercare that determines whether the repotted plant thrives or struggles through the weeks following the move.
Why Spring Is Biologically the Right Time
The reason spring repotting works better than repotting in other seasons is not arbitrary. It connects directly to how plants regulate their internal chemistry in response to changing daylight and temperature.
Primex Garden Center’s repotting guide explains the seasonal biology clearly: just like your garden outdoors, houseplants also experience a revival each spring as the lengthening days boost their metabolism and kick-start another year of growth. Repotting them in the spring gives them the room they need to expand while also providing them with fresh, nutrient-packed soil right when they need it most. Spring’s optimal growing conditions ensure houseplants will take root and are less likely to go into shock after the move.
Penn State Extension’s repotting guide is the most specific on timing: the best time to repot a plant is in the spring when it naturally and actively begins its seasonal growth. The roots will grow into the new potting mix, and the plant will produce new foliage.
Additional Benefits
Veryplants identifies two additional benefits that are often overlooked. First, the old potting mix has lost its structure, drainage, and most of its nutrients. Replacing it just before the growth surge means the plant gets clean, aerated soil at exactly the moment it needs it most. Second, repotting forces you to look at the roots. Spring lets you spot rot, pests, or compaction before summer heat amplifies the damage.

There is one important exception to the spring timing rule that every plant owner should understand: an emergency repot can happen any time of year. Veryplants is direct about this: if a plant is wilting from severe root rot, sitting in a flooded pot, or has been in the same compacted mix for three or more years, repot today. Do not wait for spring. Timing is a preference when all else is normal. In an emergency, it becomes irrelevant.
Reading the Signs That a Plant Needs Repotting
The most important skill in spring repotting is accurate diagnosis. Repotting unnecessarily, when a plant is healthy and roots are not yet restricted, adds stress without any benefit. The point is to repot when the plant actually needs it, not on a fixed calendar schedule.
According to horticulturist James Mastaler, PhD, quoted in Dengarden’s repotting guide, repotting should happen only when needed. Every time you repot a plant, you risk damaging its roots. The best time to repot is usually when the plant is actively growing, typically spring or early summer, but the need itself determines the timing, not the calendar.
Diagnostic Signs
Penn State Extension lists the diagnostic signs to check before any repotting decision. First, check how frequently watering is needed. If the potting mix dries out very quickly, even during cooler temperatures, root competition is likely consuming soil moisture faster than it can be replenished. Next, look for roots growing through the drainage holes. Finally, check whether foliage and stem growth have stopped or slowed even when fertilised regularly during spring and summer. If any of these are true, remove the plant from its container and examine the roots directly.
Root-Bound Signs
Primex Garden Center gives the most complete visual checklist of root-bound signs. Roots peeking through drainage holes or through the top of the soil indicate the plant has outgrown its space. A plant that is frequently tipping over or top-heavy signals that roots do not have enough space to provide adequate anchoring.
Stunted growth despite good light and regular feeding points points to root competition for nutrients. Circling roots, visible when the plant is gently removed from the pot, show that the root system is looping on itself, with nowhere left to expand. Find out how to grow healthy coleus plants and enjoy their bold, colorful leaves all season long.
Mahoney’s Garden Center’s spring repotting guide adds one often-missed sign: white mineral buildup on the soil surface. This crust of salt and mineral residue indicates old, depleted soil where fertiliser and hard water minerals have accumulated over time. It is a sign that the soil needs replacing, even if the root system is not yet physically bound.
The tip from Brooklyn Botanic Garden’s repotting guide that solves the most common diagnostic question: roots have a growth hormone called auxin located in the undersides of leaves, the stem, and the roots. Ideally, roots and the top of the plant should grow simultaneously. If a plant becomes root-bound, you wind up stunting its growth by not repotting. A plant that is the same size after two or three years and has not yet reached its mature size is a strong repotting candidate.
Plants That Do Not Need Annual Repotting
Knowing which plants to leave alone in spring is as valuable as knowing which ones to repot. Unnecessary repotting stresses plants without benefit and wastes both time and potting mix. Bloombox Club’s April 2026 repotting guide confirms that slow-growing plants like succulents and snake plants may not require frequent repotting; checking for root health is more useful than following a strict schedule. Veryplants gives the general guideline: most healthy houseplants want repotting every 18 to 24 months, sometimes longer.
Bloombox Club specifically notes that Hoyas and Ponytail Palms thrive in slightly root-bound conditions, repotting these plants before they genuinely need it disrupts a comfortable environment that suits their biology. For plants that are healthy and simply due for a soil refresh rather than a size increase, Veryplants recommends top-dressing as an alternative.
This involves scooping out the top two to three centimetres of old soil and replacing it with a fresh mix. It refreshes the surface layer, adds new nutrients, and gives the plant another year in the same pot. It is not a substitute for a full repot if the plant is root-bound, but for plants that are healthy and just due for a refresh, it is a practical alternative that takes under a minute.
Choosing the Right Pot Size
Pot sizing is where many spring repotting attempts create new problems instead of solving old ones. The instinct to give a struggling plant significantly more room, to choose a much larger pot to make sure it has space, consistently backfires.
Dengarden’s repotting expert guide quotes James Mastaler directly: it is best to choose a new pot that is just one to two inches wider than the current one, since oversized pots can lead to soil mass that stays wet for too long, and eventually that could lead to root rot.
Root Level
Veryplants explains why this matters at a root level: an oversized pot holds extra moist soil that the existing roots cannot absorb. That extra moisture rots roots, especially in winter when growth slows. A right-sized pot has just enough new room that the roots can spread for one growing season.
Brooklyn Botanic Garden gives a concrete sizing example: for a plant currently in a three-inch pot, the replacement should be no larger than a five-inch pot. The step-up should be proportional to the plant’s current size, not aspirational about how large it might eventually grow.
Bloombox Club notes the consequence of going too large that most beginners do not expect: choosing a pot that is too large can cause the plant to focus on root growth instead of foliage, flowers, or fruit. When root spread is easy because there is ample unused soil available, the plant prioritises expanding the root system over producing visible above-ground growth. The result is a plant that shows no new leaves or stems despite being in fresh soil.
The exception, the plant that you do not want to grow larger, is handled differently. Penn State Extension describes the approach clearly: if you are satisfied with the plant’s current size, remove the outer section of the plant roots, return the root ball to the same container with some new potting mix, and cut back some of the top growth to match the reduced root system. This is exactly the logic behind bonsai, controlling size by managing root space.
Matching Soil to Plant: The Fundamental Repotting Decision
The choice of potting mix matters more than almost any other repotting decision. Using the wrong soil type undoes the benefits of a fresh mix and creates new problems within weeks.
Mastaler’s Core Principle
Dengarden’s repotting expert guide quotes Mastaler’s core principle: it all comes down to using the right soil mix for your plant, which is crucial to the long-term health of the plant. Custom-blended soil mix recipes for different plant categories, an aroid mix for most tropicals, a grittier mix for cacti and succulents, reflect the genuine differences in what different root systems evolved to grow in.
Penn State Extension is specific about one universal rule: do not use garden soil in indoor containers for houseplants. Garden soil could lead to disease and pest problems. Instead, choose a good-quality soilless potting mix created specifically for potted plants. These mixes may include varying proportions of perlite, vermiculite, peat moss, coir, and added fertilisers and minerals.
Three-Category Breakdown for Matching Mix
Veryplants provides the most useful three-category breakdown for matching mix to plant type.
Aroids (including Monstera, Philodendron, Pothos, and other tropical climbing plants) dominate modern houseplant collections. They evolved as understory and climbing plants in tropical forests, where their roots threaded through bark, leaf litter, and air pockets, never sitting in dense ground soil. They need a chunky, well-aerated mix: standard potting soil combined with perlite, orchid bark, and coco coir provides the drainage and airflow their roots expect.

Orchids require the most specialised mix. Their epiphytic roots evolved to grip bark and absorb moisture from the air, not grow through dense soil. A dedicated orchid mix of medium-grade fir bark, perlite, and sphagnum moss provides the open, airy structure those roots need. Standard potting soil kills orchids through waterlogging within weeks.
Succulents and cacti need the opposite of what tropical plants require. A gritty mix of cactus soil or standard potting mix combined with coarse sand or perlite at a one-to-one ratio provides the rapid drainage their roots evolved for. Any moisture retention beyond the minimum causes root rot in desert plants within days in warm conditions.
Brooklyn Botanic Garden offers a practical shortcut for beginners: take a good look at the soil your plant came in from the nursery. This tells you about its moisture needs. A plant potted predominantly in peat moss likes more humidity and moisture retention. A plant in coarse bark and perlite needs fast drainage and open airflow. The original soil choice reflects the plant’s natural requirements.
Drainage: The Non-Negotiable Requirement
Every repotting decision must include one absolute requirement: the new pot must have drainage holes.
Veryplants names drainage holes as non-negotiable for almost every houseplant. If you love a decorative pot without drainage, use it as a cachepot, keep the plant in a plain plastic nursery pot with drainage, and slip that into the cachepot. Lift it out to water. This approach allows you to use any decorative container without sacrificing the drainage the plant’s roots require.
Penn State Extension adds an effective technique for preventing soil loss through drainage holes without restricting water flow: place a small square of screen over the hole at the bottom of the pot. This allows excess water to drain through the hole but prevents the potting mix from washing out during watering. A small piece of mesh, a coffee filter, or even a piece of window screen cut to size accomplishes this without compacting over time the way the popular pebble-at-the-bottom method does.
The Step-by-Step Repotting Process
Penn State Extension provides the most methodical guide to the repotting process itself. Following each step in sequence minimises root damage and reduces the recovery period that follows repotting. Keep your houseplants thriving this fall with easy seasonal care tips and maintenance advice.
Step 1: Water the plant before repotting.
Water the plant in its original container and let it rest for one hour before proceeding. This serves two purposes. First, a well-hydrated plant experiences less stress during root disturbance because its cells are fully turgid and resilient. Second, moist soil holds together as a root ball more effectively than dry soil, which crumbles and exposes individual roots to air damage.
Step 2: Prepare and clean the new container.
If the container was used previously, clean it thoroughly and sanitise it with a solution of one part bleach to nine parts water. Pathogens from a previous plant’s root system survive on pot surfaces and can reinfect a healthy new root system immediately. A new unglazed clay or terracotta pot requires soaking in water overnight to prevent it from drawing moisture away from the potting mix when the plant is first repotted.
Step 3: Place the screen and base soil.
Cover the drainage hole with a mesh square to retain soil. Add a layer of fresh potting mix to the bottom of the new container so that when the root ball is placed on top of it, the top of the root ball sits approximately one inch below the lip of the pot. This inch of clearance prevents soil from washing over the rim during watering.
Step 4: Remove the plant from its current pot.
Tip the current pot on its side and slide the root ball out gently. If the plant is stuck, which happens frequently in root-bound plants where roots have grown through drainage holes or pressed against the pot walls, squeeze a plastic pot gently on all sides, or run a thin knife around the inner edge of a rigid pot to separate the roots from the wall.
Step 5: Examine and loosen the roots.
Once the plant is out, gently tease the roots so they are no longer densely matted or circling the root ball. Penn State Extension describes this loosening as essential; roots that remain in a tight circle continue growing in that circular pattern in the new pot rather than expanding outward into the new soil. Breaking the pattern at repotting redirects growth outward.
Step 6: Trim damaged or dead roots.
Using sterilised scissors or pruning shears, remove any roots that are soft, brown, mushy, or hollow. Brooklyn Botanic Garden recommends spraying remaining roots with neem oil if root rot was present, then repotting into slightly damp soil. Sterilise tools between cuts when moving from visibly damaged sections to healthy ones.
Step 7: Place the plant and fill with fresh mix.
Set the root ball in the new pot and fill in around it with fresh potting mix, pressing gently to eliminate large air pockets without compacting the soil. The crown of the plant, where the stem meets the root, should sit at the same depth it was in the original container. Burying the crown deeper than it was previously encourages stem rot at the base.
Step 8: Water to settle.
Dengarden’s repotting expert quotes Mastaler: after repotting, water again to help the new soil settle in around the root ball. This first watering collapses air pockets in the new soil and brings it into contact with the roots, both of which support faster re-establishment.
Aftercare: The Weeks That Determine Whether Repotting Works
The care given in the two to four weeks following repotting has as much influence on the plant’s outcome as the repotting process itself. This period is often where beginners undo the careful work of repotting by reverting to pre-repotting care habits without adjusting for the plant’s new situation.
Move to indirect light immediately.
Mahoney’s Garden Center is specific: after repotting, keep the plant in a spot with bright, indirect light and avoid overwatering while it acclimates to its new home. The plant’s root system is disrupted and cannot support full photosynthesis under strong light. Indirect light reduces the plant’s energy demand while its roots reconnect with the new soil.
Expect temporary wilting.
Mahoney’s Garden Center gives the reassurance beginners need: after repotting, the plant may look a little droopy or shocked. That is normal. This is called transplant shock, a temporary state caused by root disturbance rather than ongoing damage. Most plants recover visible turgor within three to seven days as roots reconnect with the moist surrounding soil.
Do not fertilise for two to four weeks.
Bloombox Club specifies waiting at least two to four weeks before fertilising to allow the plant to recover and establish itself in the new soil. Fresh potting mix contains nutrients. Adding fertiliser on top of this creates a salt concentration that burns the tender new feeder roots trying to grow into the mix. The exception is if the potting mix used contains no fertiliser at all, in which case, a light half-strength application after two weeks is appropriate.

Resist the urge to overwater.
The most common post-repotting mistake is watering too soon because the soil looks dry on the surface. New potting mix retains moisture differently from the compacted old mix; it may hold more moisture at depth than the surface indicates. Check the top two inches before every watering during the recovery period.
Do not repot again if the plant drops leaves.
Leaf drop after repotting is a stress response, not a signal to repot again or change conditions dramatically. Home Garden Glow’s repotting guide notes that appropriate watering practices after repotting help the roots establish more quickly and reduce transplant shock. Keep conditions stable, maintain indirect light, and allow three to four weeks before assessing whether the plant is recovering.
Special Situations Requiring Different Approaches
Repotting a plant returning indoors from summer outside. Brooklyn Botanic Garden gives an important advisory for this scenario: plants set outdoors in spring and brought back indoors in autumn should be repotted to avoid pest infestation. Pests have up to a 90-day gestation period. Before repotting, dip the plant in diluted neem oil to drown any eggs. Eggs hide on the undersides of leaves, so ensure complete coverage. When repotting, use fresh soil entirely.
Repotting to treat root rot. Brooklyn Botanic Garden identifies the protocol: remove all soil and examine the roots to remove whatever looks dead or rotting, spray remaining roots with neem oil, and repot into slightly damp soil. The critical difference from standard repotting is that all old soil must be discarded, root rot pathogens survive in soil and will reinfect healthy roots if any old medium is retained.
Top-heavy plants with no root-bound signs. Brooklyn Botanic Garden addresses this case: sometimes a plant grows in a way that outpaces its roots and becomes top-heavy, with stems and leaves bigger than what the roots in a small pot can support long-term. Moving to a larger pot helps it grow more proportionally. This is the situation where upsizing is appropriate even without the root-bound signs that typically trigger repotting.
FAQs
Q1: What is the absolute best week to repot most houseplants?
Veryplants identifies mid-April to mid-May as the sweet spot for most plants in most climates. The plant is in active growth, light levels are rising, and there is a full growing season ahead for the roots to re-establish before the next winter slowdown.
Q2: Can I repot a plant that is currently flowering?
Not if it can be avoided. Repotting during flowering causes energy diversion from bloom maintenance to root recovery, typically resulting in flower drop within days. Wait until the flowering period ends before repotting. If the plant is in genuine distress, root rot, or flooding, repot immediately regardless of flowering status and accept the bloom loss.
Q3: My plant’s roots are coming out of the bottom, but it still looks healthy. Does it need repotting?
Penn State Extension recommends removing the plant and examining the roots directly before deciding. Roots through the drainage holes are a strong signal of pot-bound conditions, but the definitive check is whether the roots are circling densely inside with little visible potting mix. If yes, repot. If roots are sparse and the mix is still present, the drainage-hole growth may not yet indicate urgency.
Q4: Is it ever acceptable to reuse old potting soil?
Bloombox Club states that old soil can be reused if sterilised and supplemented with fresh nutrients, but it is best to mix it with new soil for optimal plant health. Penn State Extension recommends against using garden soil entirely. For root rot situations, Brooklyn Botanic Garden advises discarding all old soil without exception.
Conclusion
Spring repotting is one of the highest-return activities in houseplant care. Done at the right moment, when the plant genuinely needs it and the season is with you, it provides a full growing season’s worth of benefit from a process that takes under twenty minutes per plant.
The diagnostic skills matter more than the mechanical steps. Knowing whether a plant needs repotting at all, choosing the correct pot size increment, matching the soil to the plant’s root biology, and managing the recovery period with appropriate light and restrained watering, these are the decisions that determine outcomes. The mechanics of the repotting itself are straightforward once the decisions are made correctly.
Start the season by checking every plant in your collection. Remove each from its pot briefly and examine the roots. Repot the ones that need it with the right mix and a correctly sized pot. Top-dress the ones that are healthy but overdue for a soil refresh. Leave the ones that are content exactly where they are. By mid-May, the plants that needed the move will be extending new roots into fresh soil and producing the spring growth that makes plant care genuinely rewarding to watch.

Ajwa Asif is a writer with a passion for plants, gardening, and creating educational content. She researches plant-related topics using reputable horticultural resources and shares practical advice to help readers grow healthier plants and build confidence in their gardening journey. Her content focuses on delivering clear, reliable, and user-focused information.